
Return to VK3YE beginner and general articles
|
First contacts on amateur radio (Australia)
You've passed the assessment, paid your licence fee and got a brand new callsign. Then what?
This article gives some ideas for newcomers to amateur radio. Because most start with a Foundation licence
this section will only cover equipment and bands that they can use. You probably won't find material quite this specific elsewhere so I'd encourage you to read it in full. However if you
just want to get going quickly, zoom down for some sure-fire rig, antenna and band ideas.
Step One: What do you want to do?
If you're anything like me when I started, you won't have a clue.
So I'll answer the question for you.
My guess is that you just want to get on air and talk to wide range of people.
Right now it doesn't matter much where they are, but you do want to be heard and for contacts to be fairly easy to get.
Step Two: Choose a band
You'll recall that you can choose between HF bands at 3.5, 7, 21 and 28 MHz. On VHF you have 144 MHz and on UHF 430 MHz.
You can run 10 watts power, which is modest but usable. It's easy to buy a radio to cover all these bands but antennas
are a different story. When setting up a station first pick one or two bands only. Antennas can be added for more bands
later. When making your choice, only select bands that offer consistently high activity during the times you wish to
operate.
A quick rundown of available bands is as follows:
3.5 MHz (80 metres): Busiest at night but also activity late afternoons and early mornings. Reliable contacts up to
500km, with occasional contacts up to 3000 km. Needs at least 20 metres of yard space for an efficient wire antenna.
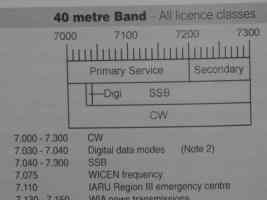
7 MHz (40 metres): Consistently active during mornings, daytime and afternoon. Less evening activity than 80 metres.
Reliable contacts up to 1000 km, with occasional international contacts. Needs at least 10 metres of yard space for
an efficient wire antenna.
21 MHz (15 metres): Provides daytime interstate and international contacts during high sunspot years.
Weak signals at other times.
28 MHz (10 metres): Provides daytime interstate and international contacts during high sunspot years. Within Australia
sporadic-E propagation in midsummer and midwinter. Little activity at other times. FM repeaters in some areas provide
variety.
144 MHz (2 metres): Active morning to night in the larger cities. Good clear local coverage; FM transmit range is
typically 20 to 50 km with longer range during temperature inversions. SSB or repeaters extend range up to 150 km.
Internet linking in some areas. Mast or pole required for vertical or beam antenna.
430 MHz (70 centimetres): Similar characteristics to two metres but generally less activity, less transmitting range
and higher feedline losses. FM repeaters and internet linking in some areas. Mast or pole required for vertical or
beam antenna.
Best Picks
The best band depends on your interests. The activity on them is best summarised as follows:
Short distance/clear communications 144 and 430 MHz FM are the favourites for talking around town, especially from mobile or handheld transceivers.
Medium distance/regular activity If you enjoy being able to make contacts almost any time you switch on, 3.5 and 7 MHz are the places to be. 7 MHz is a good all-round band active day and night, while 3.5 MHz sees most use late afternoons, evening and early morning.
Long distance/volatile activity Turn to 21 or 28 MHz for worldwide communication but be prepared for times when there's little happening. Compared to 7 MHz it's harder to get contacts but when you do they're more likely to be thousands of kilometres away.
7 MHz would be my choice if forced to have one band. This is due to the variety of stations easily workable, the quality of contacts and its generally high activity.
Although if you mostly operate in the evenings then 3.5 MHz is also recommended, particularly in low sunspot years such as 2016 - 2020.
The Foundation guide to frequencies and getting contacts has videos describing what the various bands can do in more detail.
Also see QRP activity by band for information on how useful each band is with low transmitter powers.
Step Three: Erect an antenna (or two)
There are many fancy antennas around and it is possible to part with a lot of money for no increase in performance.
Despite wild claims, no magic ingredient exists and many expensive multiband antennas are inferior to what can be
made at home. This section will discuss suitable starter antennas for both HF and VHF.
HF
There are many different antenna types but on HF the basic horizontal dipole is as good as any and better than many.
It comprises two equal lengths of wire either side of a coaxial cable feedline. No antenna coupler is needed. Mount the antenna high and in the clear if possible. Unless you have very tall
towers don't worry too much about orientation; it won't make much difference. It is also OK if the wire droops down at each end to fit it in your yard.
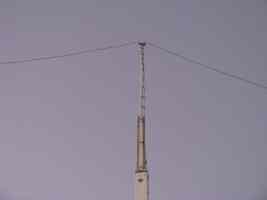
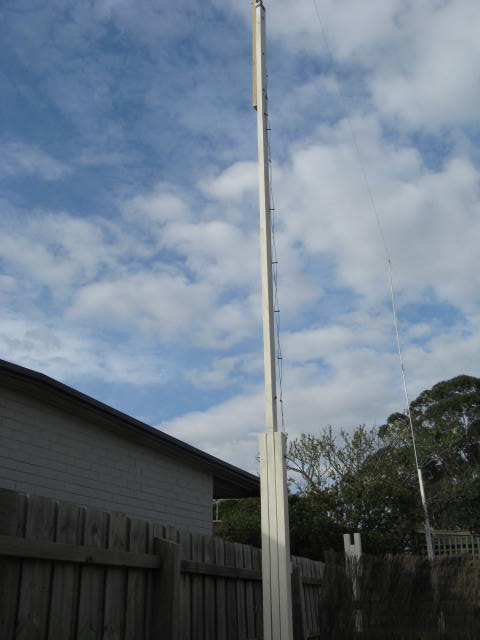
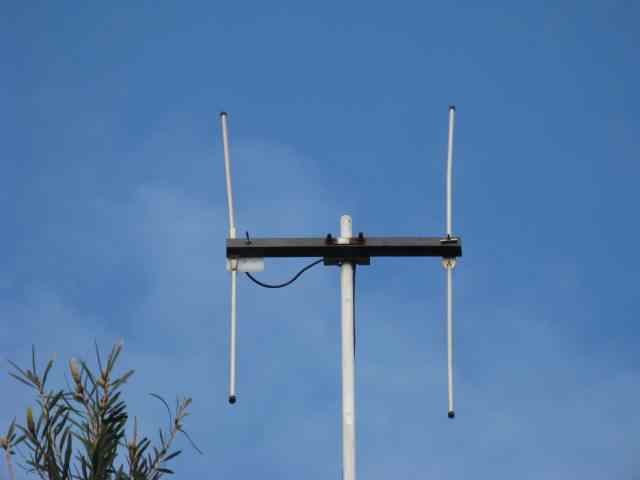
A dipole for 3.5 MHz (80 metres) is almost exactly 40 metres from end to end, while the 7 MHz (40 metres) version is 20 metres. If you cannot fit the whole length in a straight line it is fine to bend the wire at the ends. If you only have one tall pole, use this for the apex and erect it as an 'inverted-V', with the ends drooping below the feed point apex. Dipoles can be made to operate on several bands by running extra wires off the one feedpoint. For example a dipole with 2 x 20 metre wires and 2 x 10 metre wires will work efficiently on both 80 and 40 metres. An alternative, if short of space is to just use a 7 MHz dipole and add traps or loading coils to get 3.5 MHz coverage. Bandwidth will be limited but performance will still be adequate. Dipoles for 21 and 28 MHz are shorter, or you could use a vertical to provide a lower radiation angle better for long distance contacts. VHF/UHF Some sort of omnidirectional vertical antenna is a good first choice for 144 MHz. The well-known 1/4 or 5/8 wave ground plane mounted as high as possible with as good a cable as you can afford will be fine. The 1/4 wave type is perhaps most versatile since it provides basic capability on both 144 and 432 MHz. In contrast the 5/8 whip for 144 MHz will only also operate on 50 MHz which is not a Foundation licence band. Long beams are the most powerful antenna there is but need a rotator which can be complex to control. If most stations you wish to work are in one broad direction, a two element beam is a good way to get some improvement. It's fairly broad off the front and has similar gain to a much taller commercially made vertical. Also, unlike bigger beams it radiates significantly off the back, which can sometimes be useful.
 As with all antennas, avoid dissimilar metals being in contact with one another and use sealants to prevent moisture ruining the cable and increasing losses. For handheld radios, a quarter wavelength whip made from about 480 mm of stiff wire soldered to a BNC plug can boost its performance on 144 MHz yet still work on 430 MHz. Or if you want something smaller try a quarter wavelength whip about 160mm long for 70cm only. Specially-made antennas for amateur handhelds are also available off the shelf. Most cover both VHF and UHF, thus avoiding the need to change antennas when changing bands. The most foolproof 144 MHz mobile antenna is a 1/4 wavelength whip (also 480mm) mounted in the centre of the car's roof or on the roof rack. 5/8 wavelength whips are longer (over a metre) and provide somewhat better performance, but can be damaged by trees and low garage doors. Mounting location is also important; a hole through the centre of the roof is more efficient than magnetic, gutter or bonnet mounts. Mobile antennas for both 144 and 430 MHz exist but they are either a compromise or expensive to buy. With all types of VHF/UHF antennas feedline loss is a constant threat to performance. A bad feedline swallows up half or more of your transmitter power (even before it gets to the antenna) and degrades reception. Loss is determined by the length and quality of the coaxial feedline, with thicker cables being less lossy than thinner cables. Before using long runs of cable, use look-up tables to see if the loss is acceptable. A loss of less than 1dB (20% of power) is good, 2dB (36% loss) usable but not optimum, while 3 dB (half your power) is poor. Sure, you'll still get contacts with a 3dB loss, but given the 10 watt power limit, isn't it better to ensure that most reaches the antenna? Best Picks For a setup that's guaranteed to work well first off, yet is amenable to extension later, I suggest the following: HF: Half wave dipole fed with the one coaxial cable feedline. One cut for 7 MHz should also work on 21 MHz. If you have the room wires for 3.5 and 7 MHz can be fed off the same feedline, allowing efficient operation on both bands. Or, if you're pushed for space, just build it for 7 MHz and add loading coils for 3.5 MHz. VHF home: For general FM work it's hard to go past a 1/4 or 5/8 wavelength ground plane mounted as high as possible fed with good feedline. An antenna at gutter height will get you on the air, but higher is better. Raising it to say 10 metres is like tripling your transmit power and will almost double transmit and receive range. Thin RG-58 feedline will work but could lose half your power, so the thick RG-213 or better is preferred. VHF mobile: A 480 mm quarter wavelength mobile whip mounted in the centre of the car roof is good, simple and cheap for 144 MHz. Just like how 7 MHz dipoles work on 21 MHz, quarter wavelength antennas on 144 MHz also work on 430 MHz. Because the feedline run is short, the thin RG-58 is acceptable on both bands. The above represents the most basic (but still usable) installation for most Foundation licence bands. Unless your needs and circumstances vary greatly from those stated above, don't consider anything else until later.
Step Four: Select some equipment
The basic elements of all amateur stations are a regulated power supply, transceiver, antenna feedline and antenna.
We've already discussed antennas and feedlines. Of these the transceiver is the dearest and most complex, while
the antenna and power supply can be made at home.
Power supplies
The
power supply used for radio equipment ranges from internal batteries for
portable transceivers, the car battery for mobile installations to 13.8 volt
regulated power supplies at home.
The batteries used in portable sets are small and light, but don't last long if you talk a lot at the radio's maximum power output level. For extended period portable operating, it's better to add a larger external battery connected to the radio via a cable. If your transceiver can take 12 volts
through its external power socket (check first), a 12 volt 7 amp hour gel battery will give hours of operating time. Chargers for gel batteries are available off the shelf or can be assembled at home. Alternatively, use a bank of nickel metal hydride cells for a lighter more portable station.
If using mobile equipment at home, a 13.8 volt high current regulated power supply is a must. Though a 4 to 6 amp supply will power any transceiver delivering the Foundation power limit, think very carefully before spending much on building or buying one. Unless it is useful for other purposes, such a supply represents false economy if you upgrade your licence and want to run higher power. Instead, pay more for a 20 to 25 amp supply as these can run 100 watt transceivers.
There's two main types of power supply; heavy and light. Heavy supplies have a big transformer, cost more
and are less efficient. Light supplies are switch mode (like in computers), cost less and are more efficient.
Heavy supplies rarely put out RF interference so are excellent for radio work. Whereas some switch mode
types throw out noise and severely spoil reception. If you do buy a switch mode unit, make sure it's been proved
by other amateurs to be suitable for HF radio work.
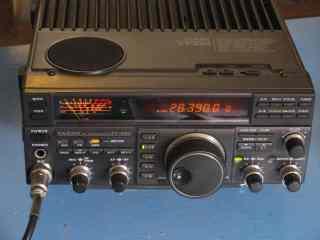
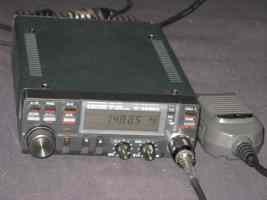
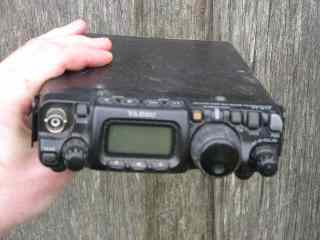 HF transceivers If buying new, the Yaesu FT-817 (pictured above) provides all-band operation within Foundation power limits. The less common Icom 703 is another contender for a low power HF rig. Basic 100 watt transceivers such as the Yaesu FT-840 or Icom IC-718 are easy to use and can be turned down to 10 watts. Again these are HF-only. 1970s and 1980s low power transceivers such as the Yaesu FT-7, FT-77S, FT-301S and Kenwood TS-120V are popular with budget buyers. Though still serviceable (if looked after) disadvantages include omission of some bands, frequency drift, bulk and weight. Also rigs that old may not be supported by local service agents. Then there are single or two band transceivers available from suppliers such as MFJ, Elecraft, YouKits and Ten Tec. These can be excellent backpacker portable rigs. They transmit Morse and/or voice. Unless you can get one at a low price they work out quite dear on a dollars per band basis. For more information on HF equipment, see Equipment and equipment reviews and Your First HF Transceiver.
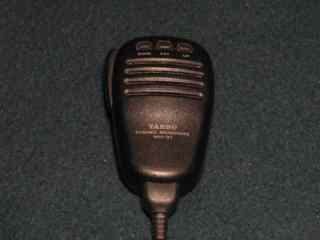
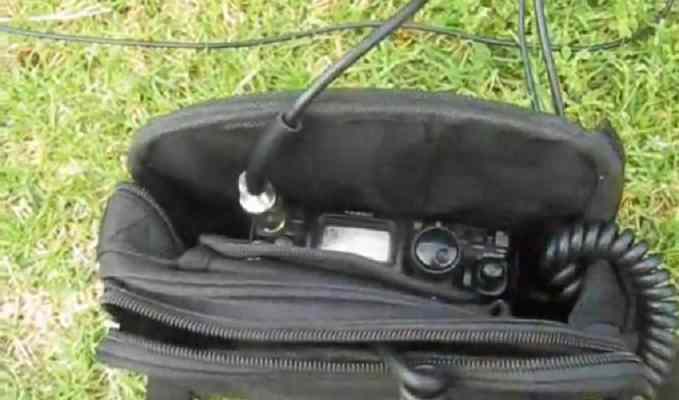
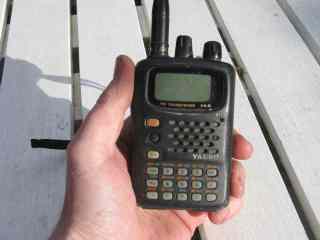 VHF/UHF transceivers 144 MHz operators can choose between handheld, mobile and home station-type transceivers. Most cover 430 MHz with some also including 50 MHz. A handheld unit has limited range, power output and battery capacity. Unless operating from hilltops you are largely dependent on operating through repeater stations whose availability varies, particularly in the country. I would not suggest a handheld (or indeed any VHF FM transceiver) as an only radio if you want a rig that holds your interest and allows experimentation with various facets of amateur radio. On the other hand Chinese 144/430 MHz transceivers are so cheap now (some under $50 new) that they provide a great sampling of local activity and get you on the air. When buying a handheld ensure that you also get a good battery pack, a longer but lightweight antenna (at least 30 or 40cm long) and connectors for external power/battery charging, speaker/microphone and antenna. Useful features include sufficient power output (4 or 5 watt radios are larger than half watt sets and have longer range), CTCSS subtone for some repeaters and a DTMF keypay to access internet linked repeaters.
 A mobile 2m/70cm FM transceiver is better for those on the road a lot or want something to set up at home. Accessories include a suitable antenna (can be made at home) and a 13.8 volt power supply (for use at home). Mobile transceivers may have a 50 watt maximum power but normally have reduced power settings. Again a DTMF keypad on the microphone is desirable to use IRLP systems. Like their smaller mobile cousins, most of the larger home station transceivers run more than the Foundation 10 watt power limit but can be turned down. These rigs can often operate SSB voice as as the more common FM voice. Older all-mode transceivers only covered a single band but these days they cover multiple bands. The SSB and CW (Morse) produced is exactly the same as heard on the HF bands and is good for long-distance and satellite operation. As an example, your range on FM simplex may be 20 to 100km whereas on SSB it may be double that or more. Most home station transceivers currently on the market generally include coverage of the HF bands as well as VHF/UHF, so they are a good choice for the amateur seeking a 'do everything' transceiver. However, these transceivers normally still require the use of an external high current 13.8 volt regulated power supply to operate. Operating VHF/UHF FM varies from using HF SSB. If you are using repeaters you will need to set the transmitter and receiver up to use different frequencies. This difference is known as the frequency offset. The transmitter frequency may be below or above the receive frequency. Common repeater offsets are 100 kHz (28 MHz), 1 MHz (50 MHz), 0.6 MHz (144 MHz) and 5 MHz (430 MHz). Any FM rig you buy should have this function. Worth having in an FM transceiver is CTCSS encode. CTCSS puts a very low-pitched audio tone on your transmission. It is useful because some repeaters require you to send this tone before it will retransmit your signal. This is particularly so for repeater systems in high-RF areas or those which are linked to repeaters on bands such as six and ten metres. CTCSS decode is nice to have but not essential. Its main use is to reduce false triggering of your mute if you're in a high-RF environment. It only works if the repeaters in your area have a CTCSS tone on their output signal. Some microphones include a DTMF (or touch-tone) keypad. DTMF is a tone signalling system the same as that used on your home telephone. Typical applications include remote control, repeater linking and automatic phone patching. The spread of internet repeater linking makes the DTMF microphone a highly desirable feature. See eHam for equipment reviews, supplier ads in Amateur Radio magazine and trader websites such as VKHam and eBay for current for used equipment listings.
Step Five: Know the appropriate operating procedure
The basic principle is to operate without causing interference to others. This relies on the use of band plans and people following agreed procedure in relation to starting, conducting and ending contacts. Band plans are necessary since equipment set up for one mode often cannot receive another. Also, since they encourage a gathering of activity around particular frequencies or band segments, people using a particular mode can more easily find others to talk to.
 Once you've picked a likely frequency listen for at least 20 or 30 seconds to ensure it is not in use. Then ask if it is in use. You need to do this because there are times that you can't hear stations that others can. This is is especially true if you have high noise levels or on 10 and 15 metres where signals can skip over you yet be audible 500 kilometres away. there are many times Within this basic 'non-interference' principle there are slight differences between various band and mode sub-groups. The two main ones for Foundation Licensees are HF SSB and VHF/UHF FM voice. HF SSB can be broken down into the terse DX/Contest working and more leisurely 'ragchewing' activities. VHF/UHF FM operating has differences between simplex, repeater and internet repeater contacts. Morse (CW) and VHF/UHF SSB have their own specific procedures, but again the general principle is similar to other modes. Because you won't have memorised everything first-up, you need:
- A list of operating privileges, as set out in the Licence Condition Determination document from the ACMA All can be downloaded off the internet, but the WIA Callbook provides the information in a more accessible form, so is preferred. A clock, notepaper and/or a log book are all desirable but not mandatory.
Step Six: Getting on air and having fun
Obtaining contacts
Make contacts by doing any of the following:
- Answer a station calling CQ
Since Foundation Licensees will be using lower power and their signal may be weaker than average,
many of the low power QRP operating tips elsewhere on this website are relevant. Most times, 'tail-ending' has proved the most successful.
No one is born a perfect operator; operating technique is something gained with experience. Videos at
Foundation guide to frequencies and getting contacts have more tips.
It is wise to exercise discretion about matters discussed on air. In particular anything involving advertising or commercial dealings is strictly 'off limits'. Otherwise content is limited only to conventions of polite conversation, given that others can listen in. Those with more than one amateur in the family should take special care with security; announcing on the local repeater that 'the key is just under the doormat' is asking for trouble. Criminals have scanners, and your address is on the ACMA's internet database and in the callbook.
Existing amateurs almost always welcome CBers to their ranks, but are not kindly disposed to hearing CB jargon on on amateur frequencies. Plain language is much better. Don't ever say 'My personal is.....'; instead say 'My name is .....'. However the term 'handle' for 'name' is used, probably because it penetrates inteference better. When you wish to join a conversation in progress, just announce your callsign in between transmissions; never say 'break' or 'break break' unless it is an emergency. The related term 'Breaker' has no meaning in amateur parlance. Finally it is desirable to avoid overusing the Q-code on voice modes - QSL?
VHF/UHF variations
The main differences between HF and VHF/UHF operating are as follows:
- Channels on VHF/UHF. Similar to UHF CB, the FM sections of VHF and UHF amateur bands are divided into 'channels' spaced at 25 kHz intervals. Unlike the more free-ranging HF bands, if you call on a frequency that is not a designated calling channel, net frequency or repeater, you will most likely not get a response.
- Calling CQ. For some strange reason, it is 'not the done thing' to CQ on repeaters in some areas. Rather it is more common for people to announce that they are 'listening'. If you hear someone announce that they are listening, treat this as a CQ call and respond accordingly.
- Originating contacts. Conversations (QSOs) can be initiated either directly, on a simplex frequency (eg 146.500, 439.000 MHz), or via a repeater. In most places, you have a better chance of success by calling on a repeater. Check that the transceiver's frequency offset is switched in and correct for the repeater you intend using; some use offsets different to those specified in the Bandplan.
- Small local groups. You will notice little 'tribes' congregating on various frequencies, particularly repeaters in the larger cities. Although many monitor repeaters, and talk if called, comparatively few will respond to a random call. Some new amateurs perceive this behaviour as cliquishness. Ways around this include joining conversations where you have a point relevant to the topic, involvement with a clubs or volunteering for the repeater group. Others simply prefer the variety of a larger group and use HF instead.
- Repeaters. A lot of amateur VHF/UHF communication takes place through repeater stations. Repeaters consist of a receiver, transmitter, filters, and antenna. They are normally on high spots and are maintained by volunteer clubs or groups. Repeaters receive a signal (often from a mobile or hand-held transceiver), and retransmit it on an adjacent frequency, so it can be heard over a much wider area. This means that with low power and small antennas it is possible to communicate with people up to 100 to 150 km away, provided that you are within the service area of your local repeater.
Once contact has been established on a repeater, it is courteous to move to a simplex frequency if possible; this makes the repeater available to those unable to do so. Another reason why simplex operation is preferred is that
repeaters have time-outs, so you could find yourself cut off if you enjoy long overs on repeaters.
- Internet linking. Though VHF/UHF is normally limited to local coverage, its reach can be extended worldwide thanks to internet linking. Systems used include Echolink and the Internet Repeater Linking Project. These systems are commonly fitted to local repeaters and can be user-switched to any other connected node.
Step Seven: Involvement with other amateurs
Active amateurs can join the Wireless Institute of Australia
for the following reasons:
- Receipt of Amateur Radio magazine. This contains the news, articles and ideas you need to keep abreast of
developments in amateur radio
- Your membership assists efforts to retain and enhance amateur privileges in the face of government and commercial
pressures
- Services such as awards, contests, QSL Bureau, and others
If
you studied for your amateur licence through a club-sponsored class, you will
already have some idea of the activities of radio clubs. Apart from
running exams and licence classes, clubs also promote amateur activity by
maintaining repeaters, holding technical workshops and lectures, developing
club projects, running hamfests, entering contests, publicising amateur radio
to the general public and more. Clubs are a good way of becoming involved
in amateur activities in your local area. A listing of clubs is provided
on the WIA website.
Amateurs also interact though online forums and groups. The Amateur (Ham) Radio Australia Facebook group is
the busiest and most general. Ask a question or prearrange a contact on these and you'll almost certainly get an answer. In addition there are also other regional, club and special interest forums and
Yahoo Groups email lists.
What next?
Even within the conditions of the Foundation licence, there is scope for a wide range of activities including antenna experimentation, HF DXing, contesting, low power operating, foxhunting,
portable operation and construction (antennas, receivers and accessories only). Participation in one or more of these facets of our hobby is highly rewarding. The practical experience gained
will also make it much easier to move to a higher grade of licence, as your interest develops. Information on many of these topics is available elsewhere on this website.
Books I've written can also help. Here's some I suggest starting with:
Ham Radio Get Started (USA)
Australian Ham Radio Handbook (Australia)
Illustrated International Ham Radio Dictionary
This article is an abridged and updated version of earlier articles that appeared in Amateur Radio, October 1996 and the WIA 2000 Yearbook.
|
Books by VK3YE
Ham Radio Get Started (USA)Australian Ham Radio Handbook (Aust) More Hand-carried QRP Antennas 99 things you can do with Amateur Radio Getting back into Amateur Radio Illustrated International Ham Radio Dictionary Make your Passion Pay (ebook writing)
All material on this site |